QuickBooks being accounting software requires its users to delete and edit the data files a number of times. This is just because of the simple fact that it consumes a lot of storage space to make new files every time. But, because of the process of repeated editing and archiving data files, users might come across a QuickBooks condense data error. This error is a huge hindrance for any user, as it stops the user from file condensing. And this is where QuickBooks condense repair tool comes into play. Using this tool the QB Desktop users can get the error fixed without much issue.
In this article, we are going to talk about QuickBooks Condense Repair Tool or Condense data utility – how to use it and what are its functions. Thus, read the article till the end and learn all about QuickBooks condense repair or Condense data utility tool.
You may also read: How to perform a clean install of QuickBooks desktop for Windows?
What is QuickBooks Condense Repair Tool?
Before you learn the various aspects about this tool, it is important to get a brief introduction to the tool. Also known as QuickBooks Condense Data Utility, the condense repair tool is primarily used for the purpose of clearing out issues such as File Condensing errors. It is a great tool as a QuickBooks Condense feature is a vital part of the software as it allows the users to delete an Audit Trail. With the help of the Condense Repair Tool, the user can lessen the file size without hampering the quality of information present in the file. In simple words, the condense data utility helps the users in streamlining the company data file. If there are performance issues, the condense data utility should be the last option that the user tries in order to improve the performance.
In case the user is having an over-sized file acquiring excess of space, then in that case, the user is recommended to opt for QuickBooks condense repair tool, as it will help you to minimize the file size without any data damage. The condense feature in the new version is regarded to be better and swift as compared to the previous versions. The updated feature offers an option to remove the audit trail that reduces the file size, but it leaves all the detailed transactions. This feature is different from the tradition file condense feature that removes transaction details and also creates a consolidated journal entry for data before selecting the date. It should be noted that the traditional condense feature is still available, in case anyone wishes to opt for it.
To access this feature, the user can follow the steps below:
- Move to the file menu.
- Now, tap on utilities option.
- Click on the Condense data option.
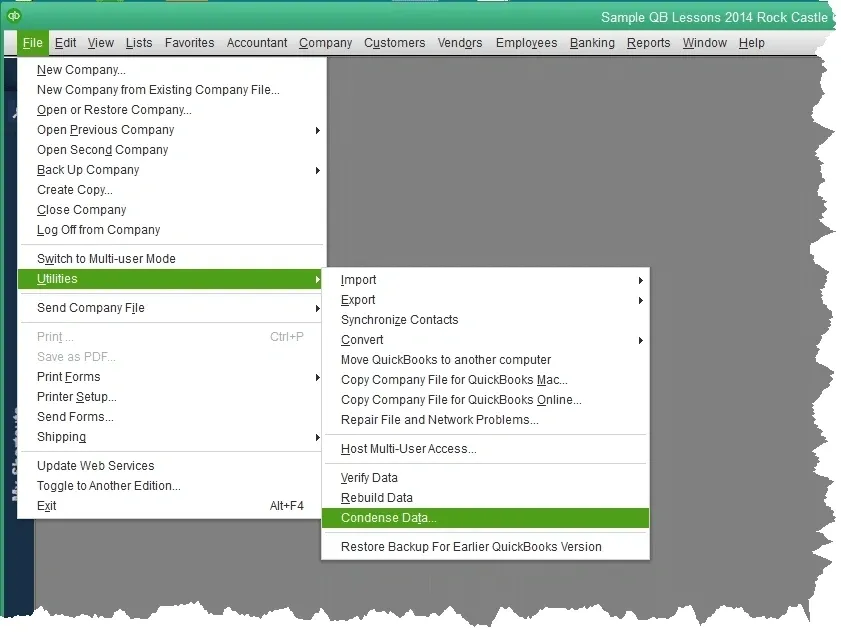
- Followed by selecting the first option.
- The next step is to opt for the Next option and then the user will see a prompt saying working on the file. After the process comes to an end, the window with a prompt telling the total reduction of the file size and the location of the backup before the file optimization will appear on the screen.
See Also: QBDBMgrN Not Running on This Computer: How to Fix?
Functions of QuickBooks Condense Repair Tool
Before we proceed to the complete process of how to use the QuickBooks Condense Repair Tool, make sure that the condense repair tool is ideal for your company. It should be noted that condensing cannot be undone, which makes it important to try out all other solutions before opting for this. The user needs to have the complete information regarding the functionalities of this tool. These features will help the users to understand the complete list of what they are going to avail by using the help of this repair tool.
1. Might Fail to fix file damage
There are times when even after using the Condense Repair tool, the damaged company file is not repaired. So, in such cases, users are advised to prefer methods like Restoring Backup Company file. Also, here are some of the transactions that are not removed by Condense feature:
| Transaction | Description/Reason |
| Payroll transactions | In case the Condense date is before 12/31 or if an employee’s W2 is not reviewed |
| Invoices, payments, credit memos, and refund checks | In case the particular transactions are not properly linked to each other |
| Payments recorded to Undeposited Funds | The ones that have not been deposited to a bank account are not condensed |
| Bills, bill credits, and bill payment checks | Not linked to each other in a proper manner |
| Estimates linked to invoices | Estimates are non-posting entries and cannot be Condensed into journal entries as they are posting transactions |
| Sales tax not paid in Pay Sales Tax | Open invoices are non-condensable and paying sales tax with checks end up in open invoices |
| Transactions linked to a non-Condensable transaction | Example: Entered an invoice on 12/15/2015 and the corresponding payment on 1/15/2016, and then run the Condense Data utility through 12/31/2015. Both transactions will not be Condensed due to the payment being outside the period and the invoice linked to a transaction that was not covered during the Condense. |
2. Condensing is non-reversible
This is something that users should understand before proceeding any further with the QuickBooks Condense repair tool. Once the company file is condensed, the actions cannot be reversed. Thus, the user needs to make sure that the file requires deleting and will not remain, as before after the completion of the process. This makes it important to ensure that you really need to opt for this or not.
We have jotted down the relevant reasons, why one should go for condense feature:
- A large data file.
- If the user has upgraded all the hardware.
- Or if the user is close to a list limit.
- Also, when the accountant and technical support has agreed to opt for the tool, which means in an emergency situation.
- Or when all other options didn’t work in your favor.
3. Might affect some specific reports
There is a definite chance that the Condensing Repair tool might leave some effects on specific reports. The reports affected by this tool are as follows:
Account based and item based reports are expected to be completely accurate as the entries on the account do not get affected as such.
- Profit & loss (accrual)
- Trial balance (accrual)
- Balance sheet (accrual)
- Cash flow statement (accrual)
There are certain reports, especially the item based ones that are expected to remain blank, due to the loss of data, namely:
- Sales and purchase reports
- Job costing reports
- A/R and A/P aging reports
You may also like: How to Fix QuickBooks Payroll Update Error Code 15217?
4. Entire cash basis reports
These reports are expected to be inaccurate.
5. Reports filtered by class
It should be noted that the transactions that are summarized by the utility will not have classes assigned. In case the user runs a profit and loss report by class, it will show all amounts in the unclassified column.
6. Sales tax liability report
When the user condenses the journal entry, an amount is credited to the income accounts. QuickBooks accounting software is not aware which part of the income is taxable and which is non-taxable. Also, the tax collected that comes from the invoices and no longer exists will show zero.
Read Also: Install and Use QuickBooks Database Server Manager
7. Account receivable collections report
It should be noted that the A/R collection report reflects the condensed journal entries under no name. Also, the entries to A/R that are not linked to the closing transactions are shown as open.
8. Sales and purchase detail report
This report is expected to be blank. The reason is that there are no more invoices and bills.
9. Audit trail report
The condense feature basically eliminates the transactions from the company file, and this results in deleting all these transactions from the audit trail report.
Read this also: How to Resolve QuickBooks Error Code 15203?
10. Reconciliation
Talking about the reconciliation, the user will witness the aftereffects of condensing the file, that the user will get a correct opening balance for the next reconciliation, checks and deposits no longer exist, ultimately resulting in incorrect or null reconciliation reports. The statement might be incorrect as the last reconciliation doesn’t exist now.
11. Preserving the reports
It should be noted that the original reports are generally preserved in the backup and archive copy, and also in any other backups that are created by the user. Before the user runs the condense, the user needs to reconcile all accounts, take a print of all reconciliation and discrepancy reports, or the user can also save the reports in a PDF format, and lastly take the backup of the company file.
For example, the user condenses data as of 12/31/2015 and it is 9/30/2016, then in that case the current company file will not have the 2015 details and also the archive copy will not carry the details of 2016. In order to check the performance of the company in comparison to the last year, the user will have to carry out the steps below:
- First of all, the user will have to export the current data from the company file.
- And then, open the archive copy, followed by exporting the historical data.
And lastly, the user will have to combine the historical data and current data in another program.
12. May not reduce file size in certain cases
In case the user is making use of the inventory items, then the list doesn’t get reduced. This results in a very few transactions being condensed with minimal change in the file size. Moreover, open transactions do not get condensed without affecting the file size.
Read this also: Creating Classes in QuickBooks
Steps to use QuickBooks Condense Repair Tool
So, here is a step by step guide which will help the users to utilize the features of Condense Repair Tool. These steps will ensure that you meet the entire requirement for before and after performing the ‘Company File Condensing’:
1. Search for the Non-condensable Transactions:
Start with searching for all the files that are non-condensable. For this, RUN any report and check the transactions that will not be condensed.
2. Running the Report:
Now, you can RUN the report and proceed to condense the QB file.
- Go to File menu > Utilities > Condense Data
- A Wizard tool pop-up will come on the screen, select ‘Transactions before specific date’ and enter the correct dates
- Click on Next and choose the option ‘Summarize Inventory Transactions’
- After that, select the method of condensing the inventory
- Choose the Transaction groups which you want to remove and select them.
- Now click on ‘Begin Condense’, this will initiate QB condense.
3. Preparation of the Company File
- Start with eliminating the data file closing date
- Go to Edit menu and select Preferences.
- Choose Accounting and navigate to the Company Preferences option.
- Fill the date in the closing date area
- Remove ‘Date’ from the Closing Date Box and Press OK button.
- Run Profit & Loss and, Balance sheet to view the transactions, after that Run Rebuild and verify the data utility files to make sure that there is no data damage
- Copy Company file and back it up
4. Saving the Comparison report:
Condensing a file might cause the deletion of some information. But, saving a comparison report will ensure that the information is still present there. Make sure to save a copy of all the reports mentioned below as PDF:
- Profit and Loss, Balance sheet
- Cash Flow Statement
- Account payable and Account Receivables
- Other essential books required by the accountant
See Also: How to fix QuickBooks Update Error 1603?
Condense your QuickBooks Desktop company file
Running the Tool:
- The very first step is to go to the File menu and Select Utilities, after that navigate to condense data
- And then, select the respective choices for condensing.
- Once done, begin condensing.
| Transactions | Unused List Entries |
| Uncleared (unreconciled) bank and credit card transactions Transactions marked “To be printed“ Invoices and Estimates marked “To be sent“ ALL Estimates, Sales Orders, Purchase Order, and Pending Invoices ALL Time and Mileage activities Transactions containing unbilled expenses and items | Accounts Customers and Jobs Vendors Other Names Items “Done” To Do Notes Classes |
Note: Before Condensing starts, QuickBooks will create a backup and an archive copy.
Period copy (Only for Premier accountant or QuickBooks enterprise version)
A period copy is a condensed version of the company file that only contains data for a certain period. In order to create a period copy, the user needs to follows the steps below:
- To begin with, the user needs to go to the file menu, and then select the Utilities > Condense data.
- And then, on what transactions do you want to remove? Window, the user needs to select the transaction outside of a date range.
- The user needs to set the correct dates for the Remove transactions before and after filter.
- Lastly, the user needs to go through the wizard and then select the options accordingly. Or else the user can select the Help option, if the user needs any kind of assistance.
- Compare the pre and post condense files
Check for discrepancies
Once the condensing company file is complete, the user needs to ensure that before and after the condense data reports match each other.
The steps to be followed are as follows:
- Re-run & print (else save it as PDF) the below reports
- And then, the Profit & loss (accrual based)
- Balance sheet for all dates (accrual based)
- Cash flow statement
- The user needs to tally the before and after condensed reports, as they should be identical. It should be noted that the condensed report should be the same as the pre-condensed one, as they are Accrual based summary reports. In case of discrepancies:
- The user need to look for transactions that are creating differences.
- And then, restore the backup.
- After that, the user needs to repair damaged transactions and rerun condense data.
- The user needs to create a new company file or use the restored company file without re-running the condense data.
Read Also: How to deal with QuickBooks Error 3371: Could Not Initialize License Properties?
Final Words!
This is how a user can effectively utilize the features of the QuickBooks Condense Repair tool. This is a perfect tool to manage space on the device as the storage space is limited, and the files are huge sometimes. So, make sure to manage the space available on the device with the help of this condensing tool. For more details, you can get in touch with our QuickBooks enterprise support team. Our team of experts and certified professionals work round the clock to provide the best possible assistance to the users.
You might also like:
How to resolve QuickBooks Error H505?